

Since A LOT of u have been asking me how to make watercolor effects, i'm going to present...tadaaa my first ever tutorial : how to make watercolor effects. enjoy :)
Before u start editing in photoshop. U have to first download the watercolor textures that u want. Just simply go to GOOGLE and type down “watercolor texture”. You can choose any texture that u like. NOTE : Choose more than 1 texture . The more the better

STEP 1
Open ur photoshop application. This time I’m going to use Photoshop CS3.
Open the image that u are about to edit

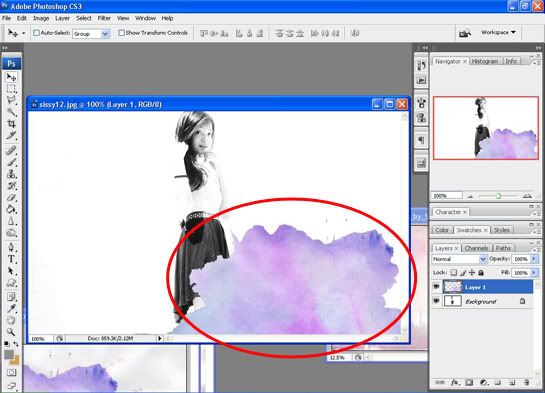
STEP 2
Open all of the watercolor textures that u are going to use.
Don’t forget to adjust the size and make it similar to the image on the first step.

STEP 3
The tricky part starts here!
A. Ok so I’m going to start with the purple texture. Try to find the “MAGIC WAND TOOL” in the toolbox (The Photoshop toolbox is where it all happens. Almost every single thing you do in Photoshop will involve using tools from the toolbox ) on ur left (as seen on the picture below) the click it or by simply typing a “W”.

B. Drag ur mouse to the texture and then ur mouse will look like a magic wand

C. Click on the texture and it will make some kind of connecting lines ( as seen on the picture below).
NOTE : When u are about to click on the texture with ur magic wand, do click on the white area/background instead of clicking on the colored area ( u can see my magic wand on step 3b, it was on the white area/background, not the colored one). Therefore, to make it more easy, it would be better if u download the watercolor texture with blank/white background)

D. After that, go to SELECT --> INVERSE

E. Then click the “MOVE TOOL” in the toolbox on the top left ( as seen on the picture below) or just by simply typing a “V”. Now ur mouse won’t look like a magic wand anymore. It looks like a black arrow or a point when u drag it to ur texture.

F. Click on the texture that are inside the connecting lines (the colored ones) then drag it to ur image (if u are a bit confused, look at ur mouse when it’s on the texture. Make sure that it looks like a black arrow or a point with a scissor on the bottom. if it looks like that, click it then drag it to ur image)


G. Place it where ever u like
amp;current=s3g.jpg" target="_blank">
H. Now, we are going to make the texture more lighter. So look to ur right. There u see whole box which is called the layer palette . All u have to do is click on ur texture layer ( on the picture above it is written as “LAYER 1”) then click the “OPACITY” (found in the upper-right-hand corner of the Layers palette, as seen on the picture below. It ranges from 0 - 100% opacity, and is very useful when working with adjusting color, sharpness, or any other adjustment.) . After that, adjust it. Here, I’m going to adjust it until 62%. Now, the watercolor texture is more lighter


STEP 4
Then ur done….with the first texture. Here, I’m going to use 2 textures. U can use as many watercolor textures as u want but remember, the more u use , the harder and the longer it gets. I’m going to use the orange one for the second texture. Now, do step 3(a-h) all over again. The steps are all exactly the same

STEP 5
When ur all done re-doing step 3 , it will look like this ( as seen on the picture below). Now ur done with the watercolor textures!!

STEP 6
Let’s add some text. Click the “Horizontal Type Tool” in the toolbox on the left (as seen on the picture below) or by typing “T”

STEP 7
Move ur mouse to the image then make a box by clicking and dragging it (it will look like the picture below)

Then write anything u want! Don’t forget to adjust the FONT, FONT SIZE , and FONT COLOR (all placed on the top as seen on the picture)

STEP 8
Now, u are done!! YEAYYY!

Do wait for my other photoshop tutorials! GOODLUCK! :)


17 feedbacks:
good tutorial :D thanks for sharinggg
nice tutorial im following you hope you visit mine
http://aucoindubisou.blogspot.com/
great tutorial, dear :)
i've follow your blog. i'm new fashion blogger.. visit http://mynameislidya.blogspot.com/ you may follow if you like..
XoXo,
Lidya :)
so cute tutorial :) and I have been following your tutorial so you can see it on my blog http://sasyadilaga.blogspot.com/ thanks
more tutorials pweaseeee:3
more tutorials pweaseeee:3
thank you for sharing the tutorial !! this is really useful :D
The Endless Wishlist
Join The Endless Wishlist shoes giveaway !
great!! thank you a lot :D. im waiting for your next tutorial.
wow that's great :)
veyveyvera.blogspot.com
thanks for the basic tutorial, i followed it and make another shoot with some improvement. come and check it :)
http://ravinakatriana.blogspot.com/
and i followed your blog too, kindly please follow my blog too♥
thank you for the tutorial. it helps me a lot :)
simple tp sesuatu ya.. keep update!
I'll try it for sure.. :)
http://jennieaprilla.blogspot.com/
thank you for sharing :))
more tutorial please :))))
kak sabila bisa bikin tutorial buat collage di photoshop ga kak?makasih ya kak
Post a Comment