

Let's get this thing started!
Step 1: Open
the file. I reccomend you to open a file with only 1 photo object, as an
example, a person.
Step 2:
Duplicate the layer (Right click --> Duplicate)


Step 3: Use the Magic
Wand Tool (W) to click the white background of the first layer. Then Select --> Inverse (Shft+Ctrl+I). Use the Move tool (V) to drag the object to the
copied layer. Place it exactly on top of the same picture.


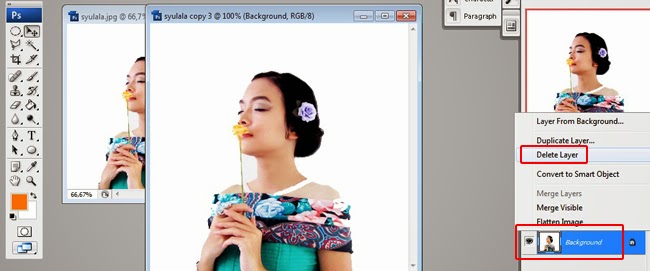
Step 4: Click on the
background --> delete layer

Step 5: Duplicate the
layer twice. Then you’ll have 3 no background-ed layers

Step 6: Let’s start with
the first layer. We’re going to change the foreground colors into purple and
white. There should be 2 color boxes, change one into purple (or any color you
want), and the other one to white just by clicking each box. Then OK

Step 7: Click on the “Create
new fill or adjustment layer” --> Gradient Map --> OK. Then type Ctrl+Shft+E to blend the
gradient map with the object


Step 8: Do the EXACT
same steps to the 2nd layer. Except this time, the color should be orange and
white (or any different color you want)

Step 9: Now drag the 1st
& 2nd layer to the 3rd layer (The un-edited no background-ed layer) with the
Move Tool (V). The purple colored layer should be below the orange colored layer.
Position it in a mixed order to create the effect. I’m going to rename it 1,2,
and 3 to make it easier

Step 10: We’re going to
change to change some things to create the effect.
“1” should be set its
Opacity to 71%.
“2” should be set its Opacity to 78%.
And “3” should be
set to “Color”


Step 11: Click the
Ellipse Tool (U) to create an ellipse. Set the color to orange (The orange
color should be the same as the orange object). Then use the Move Tool (V) to
place it below “1”.


Step 12: Use the Eraser
Tool (E) and set the brush hardness to 0%.
Then click on the ellipse --> OK.
Start erasing the edges of the ellipse. This part might be tricky
to get the perfect round shape.
Also erase a little bottom part of “2” to
create a blending effect


Step 13: Click the Horizontal
Type Tool (T) to create the text. Here, i used the “DIN BLACK” font.
Then use
the Move Tool (V) to place it above “3”. Then change it into Soft Light


VOILA!


23 feedbacks:
keren nih :D :D suka banget
sesuksore.blogspot.com
Really great tutorial here discuss you details with screen short. thanks for sharing details with source.
Multiple Clipping Path | Image Masking Service | Drop Shadow Service | Neck Joint Service
Wow that is great post, i am definitely try this work.
Clipping Creations India
Offshore Clipping Path
Arafin Media
Great job done and nice Photoshop tutorials . thanks for sharing with us .
Remove White Background
Great post thanks for sharing hope you will share more.
Best price and 100% satisfaction guaranty for high quality clipping path, remove background from image, drop shadow, retouching, image optimization for web use, raster to vector and other Photoshop services!
Clipping Path Service
Photoshop Masking Service
Background Removal Service
Drop Shadow Service
Thank you very much for your helpful tutorial. It helped me a lot. Thanks again
Magnificent outlines, every one of them appears to incite considered either what you saw or what you need me to see. Also, thank you for the article. Well said and propelling and instructional.
Thanks for sharing this great tutorial! It is very interesting and I am always searching for an educative tutorial like this. This is really pretty cool place I like it because it has some tutorials I really like. I want more on this blog soon.
I really love these resources that you share here about photosp drop shadow services, thanks
Thanks a lot for post here. I love to learn about photoshop, It will help me. multiple clipping path
Excellent article. Thanks
Thanks for the tutorial.
We are providing high quality clipping path and image editing service all over the world.
Our services are-
Clipping Path
Background remove
Photo masking
Drop shadow
Image manipulation
Retouching
Vector conversion
.....
It is awesome discussion to understand easily about the importance of clipping path specially on other Photoshop editing service. Very narrative ! Thanks,it is nice and very effective article here.
Clipping path | Photo editing
Photo Editing | Background remove
Photo Editing | Photoshop editing
Photo Editing | Background removal
Photo retouching | Photoshop editing
Clipping path | Background removal
Really Great tutorial. It's amazing and It is awesome discussion to understand easily about the importance of service.
Clipping path Service | Multi path Service | Deep etching
Color Correction Services
Photo Retouching Service | Jewelry Retouch Service
Photo cutout | Background removal
So long tutorial but very helpful. I have apply your technique it's really amazing working. thanks
Very Helpful tutorial specially the image. Your teaching technique is really good
I hope you share the next tutorial about
Hair Masking Service or
Beauty Photo Retouching
Thanks
All men by nature are actuated with the desire of knowledge, and an indication of this is the love of the senses; for even, irrespective of their utility, are they loved for their own sakes; and pre-eminently above the rest, the sense of sight. For not only for practical purposes, but also when not intent on doing anything, we choose the power of vision in preference, so to say, to all the rest of the senses. And a cause of this is the following, — that this one of the senses particularly enables us to apprehend? whatever knowledge it is the inlet of, and that it makes many distinctive? qualities manifest.
Really good post! its very informative article Keep sharing more useful and informative articles. Thank you.
You can also visit:
image masking service
Instructive article. This will be helpful for many learners. Thanks for sharing.
Graphic Aid's expert professionals will provide the photoshop Neck joint services & ghost mannequin Services at competitive price. Guaranteed service & support.
Nice! It's truly good and incredible. I think it will benefit anyone. Many thanks for sharing!
free image masking
Photography is my passion, from my childhood life I am doing work in this sector. Love to write blogs on photography tips and tutorials also publish on various platforms. Last 5 years, I am working dedicatedly in this industry. Here I would like to share my Professional knowledge which has proper guidelines to enhance my newbie photography career. Thank you
Thanks for sharing this informative article about the photoshop tutorial.
We provide all kinds of image editing solutions like Clipping path service, Background removal service, Image masking service, Neck joint service, Ghost mannequin services,
Photo retouching service, Shadow Making Service, etc using adobe photoshop.
Post a Comment