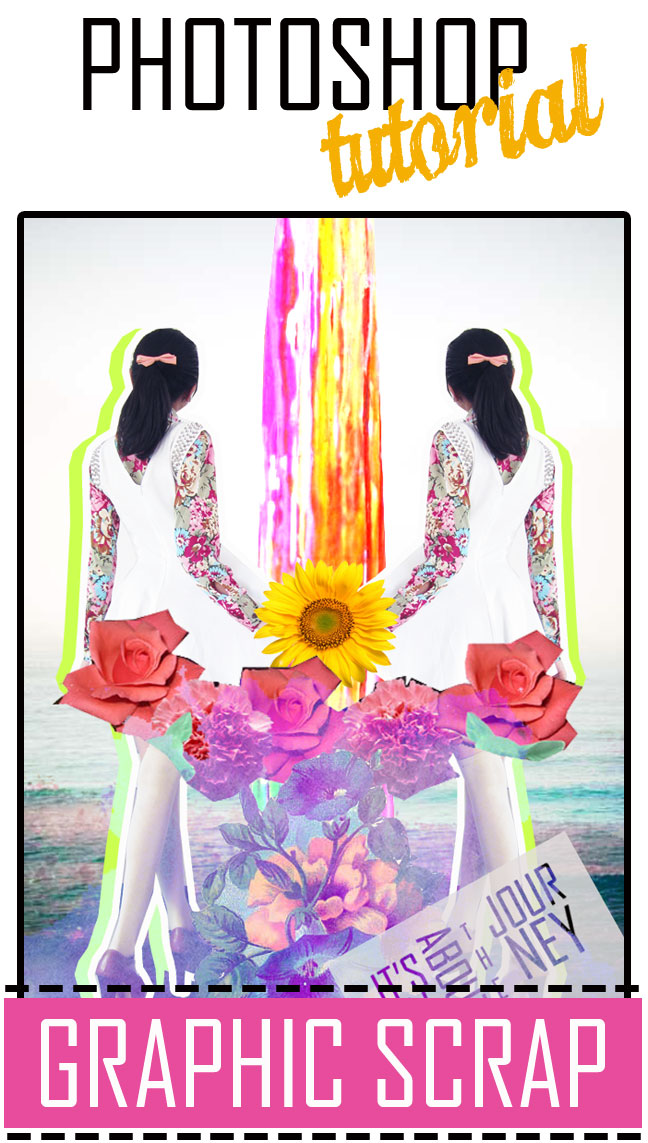
I've still remembered that a lot of u have been asking me how to make these kind of Graphic Scrap that i usually like to use for my blog photos since a long time ago. And now, i'm granting ur wish!
Its a looong way to go. Enjoy these 26 steps! :p

STEP 1
Make
sure u have thought the concept of the Graphic Scrap u are about to make. And u
also have to know that are the pictures u’re going to need. Browse through
google and save the pictures u need. But ONLY take free pictures, which means make
sure that the picture is NOT licensed or belongs to an illustrator. If it is, u
have to ask for permission first to the illustrator.
STEP 2
Open your photo that u want to edit
Make a new layer (File--> New) (Untitled-1) that is the same size as ur photo
Use
the “Polygonal Lasso Tool” (L) to cut out ur photo
STEP 3
Drag
the cutout photo using the “Move Tool” (M)
to the empty layer. Let’s call this layer “Untitled-1”, Now set it aside for a
while
STEP 4
Then, open the Background Photos and a New Layer
(let’s call it layer “Untitled-2 “) with the same size as the background
(adjust the size). This layer will be ur working layer
This time, I want to collide 2 backgrounds. But if u only want to use 1, it’s also ok
STEP 5
Drag
both backgrounds to the New Layer
STEP 6
Now
pay attention to the layer box on the right side. Make sure that the toppest background
is set to “Linear Light” and Opacity to 49%
STEP 7
Now,
bring back layer “Untitled-1” (the cutout form of ur photo).
Then pay attention to the layer box on the
right. Right click on Layer 1 -->
Blending Options
STEP 8
Choose
“Stroke” (make sure u clicked the word Stroke), change the size into 8px, and the color into
white --> OK
STEP 9
Then
drag the photo (using “Move Tool”) to layer “Untitled-2” (the one with the
combined background)
STEP 10
Now,
I want to make a mirror effect. So go back to layer “Untitled-1” --> Image --> Rotate Canvas --> Flip Canvas Horizontal
STEP 11
Now
it’s flipped! Then drag it also to layer “Untitled-2”
STEP 12
This part Is a bit tricky. I am going to make a
neon shadow effect to it.
So go back (again) to layer “Untitled-1”. Pay
attention to the layer box on the right. Then right click --> Solid Color --> (choose the color) --> OK
STEP 13
Then
click on the down arrow (it’s very small, on top of “opacity”) --> Create Clipping Mask. Or by simply typing “Alt+Ctrl+G”
STEP 14
Now
we got the shadow! But u have to Delete
the background layer in order to drag it to layer Untitled-2. Once u’ve deleted it, type “Ctrl+Shift+E”. Then
drag it to layer “Untitled-2”
STEP 15
U see,
it is placed on top of ur picture, but we have to make it below. So pay
attention to the layer box on the right, Drag “Layer 5” below “Layer 4”. Now it
is positioned below
STEP 16
Go back to layer “Untitled-1”, then rotate the
canvas Horizontally. Drag it to layer “Untitled-2”
Place it (Layer 6) below “Layer 3”
STEP 17
Ok so u might want to clear the space a bit so
it will be easier for u to work
Now, click File --> Open , then choose all the pictures u want to
use to make ur scrapbook. This time, I will only use 5
STEP 18
Let’s
start with the sunflower. Use the “Magic Wand Tool” (W) to cut it out, click on
the white background. Then Select --> Inverse , or “Shft+Ctrl+I”
Here’s
a little note. It will be much easier for u if u choose pictures with clean
background, so u can just directly use the Magic Wand Tool. But if the picture doesn’t
have a clean background, u have to use the Polygonal Lasso Tool and cut it out
one by one.
STEP 19
Then
use the “Move Tool” to drag it to layer “Untitled-2”. Place it wherever u want
to
STEP 20
Repeat
step 18 & 19 to all the other pictures
STEP 21
So now I want to make the text, but before that,
it would be better to make the box first
Click the “Rectangle Tool” (U), then shape it on
layer “Untitled-2”, adjust the color.
STEP 22
Pay
attention on the layer box on the right, change the Opacity (of Shape 1) to 84%
STEP 23
Let’s
rotate it a bit! Type “Ctrl+T” --> rotate
it --> Enter. Then place it wherever u like
STEP 24
Use
the “Horizontal Type Tool” (T), type down the text. If u want to rotate it, repeat step 23.
STEP 25
I
still have 2 pictures that I haven’t dragged to the working layer yet. I am
going to repeat step 18 & 19, then place this picture layer (layer 10)
below Layer 6. Then change it to Linear Light
STEP 26
Now
let’s make a watercolor effect! Once it is placed on layer “Untitled-2”, change
it into Pin Light, Opacity 82%
VOILA IT IS NOW DONE!
I know it seems long and complicated, but if u've followed my photoshop tutorials from the very first time, i think u will already get used to it. I suggest u to do many photoshop practices. Because indeed, practice makes perfect :)
GOOD LUCK!!


19 feedbacks:
wow, such amazing post! thanks for sharing, dear <333
xx,
www.mai-vhee.blogspot.com
Thanks for the tutorial !!
This is super cool <3
Chic Swank
WOW! love your edited!
so creative :D
PUTRIVALENTINALIM.BLOGSPOT.COM
PUTRIVALENTINALIM.BLOGSPOT.COM
PUTRIVALENTINALIM.BLOGSPOT.COM
Whoaaa thank you so much Bila!!! Really usefull <3
thanks for the tips bil!
check out our blog, new post available.
http://swedousqees.blogspot.com/ thanks!
omg thanks for sharing dear !! super cute
http://sabrinamaida.blogspot.com
Aah you're the best! Thanks for sharing this, Sabila. Not a pro though but I think I'll give it a try :D
you inspire me dear! thankyou!
thanks blog
thanks gan infonya
thanks for sharing, great! xx
Enter my Dskon.com x Rebel's Mint Closet international giveaway!
When I initially commented I clicked the "Notify me when new comments are added" checkbox and now each time a comment is added I
get four e-mails with the same comment. Is there any way you can remove people from that service?
Bless you!
Feel free to surf to my web-site ... http://www.Goldplatinumjewelry.net/the-trip-style-Guide-for-your-family/
you're so good at this photoshop editting ! i can never edit collages like you did there !
GLISTERS AND BLISTERS
It is very helpful, thank you :)
http://marschristie.blogspot.com/
thank's for the tutorial :))i will try it now !! :D
http://nadiraarasya.blogspot.com
So genius! Never thought with that step can make an amazing photo-edited. Definitely will give a try! Thanks for sharing dear <3
Cool post . Thanks for, writing on my blog man! Ill email you some time. I did not know that!
wah keren bangettt
I love your photo editing! That is SUPER COOL! Thanks a lot for sharing! :D
Post a Comment