Yeayyy another Tutorial! Well firstly i was very amazed seeing the feedback from my latest photoshop watercolor tutorial. It was great seeing u all to actually try making and following the steps, and not to forget the amazing results! So this time i'm going to show how to make :
PICTURE TEXTS
PICTURE TEXTS
Step 1
Start by opening a blank layer
Step 2
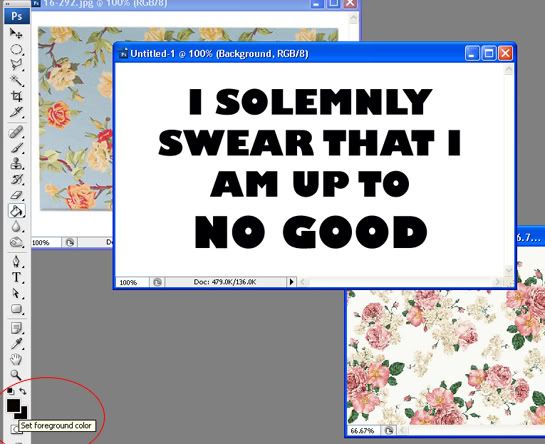
Then open all of the pictures that u are going to use. This time, I will be
using 2 floral pattern backgrounds.
Step 3
Now, use the “ Horizontal Type Tool” (or by simply typing “T”) to write down
the words on the blank layer. (I am in
fact a “harry potter movies” fan ^^)
Step 4
Make sure that the text color is black
Step 5
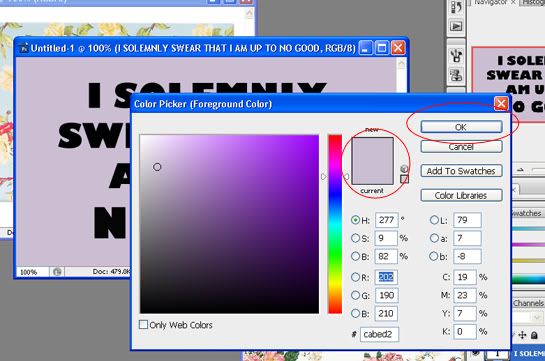
Now,
I want to change the color of the background. Pay attention to the layers box
on the bottom right. Make sure that the layer is on “background” (as seen on
the picture above).
Step 6
Click on the “Paint Bucket Tool” ( or by simply
typing “G”) then set the color by click on the “Set Foreground Color” (on the
bottom left). Choose the color you want
then click “OK”
Step 7
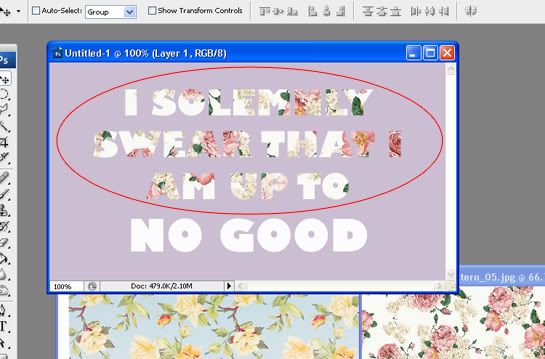
Use the “Move Tool” ( or by simply typing “V”) and
drag ur picture layer to the text layer
Step 8
It will look like this
Step 9
Now pay close attention to the layer box, make
sure that ur “picture layer “ is on top of the text words. Then click on the
small arrow on top of Opacity (look at red circle).
Step 10
Then
choose “Create Clipping Mask”. Or if you think that it’s confusing u, u can
make a shortcut by typing “ Alt +Ctrl + G”
Step 11
YEAY
U’VE MADE IT!! (here, I changed the color of the word “NO GOOD” to white)
Step 12
Overall, YOUR DONE. U can stop here. But I wanna
do a bit more on this picture to make it look better.
So, I
dragged my other floral pattern layer to the text layer (as seen on the pict.
above). Then do over step 9-10 (or u can
just type “Alt + Ctrl + G”)
Step 13
Now this is what makes it different. For the 3rd
time, look over to the layers box on the right. Then click the “Opacity”. Feel
free to arrange the opacity level. This time, I set it to 69%
Step 14
There
u go! U see the difference?
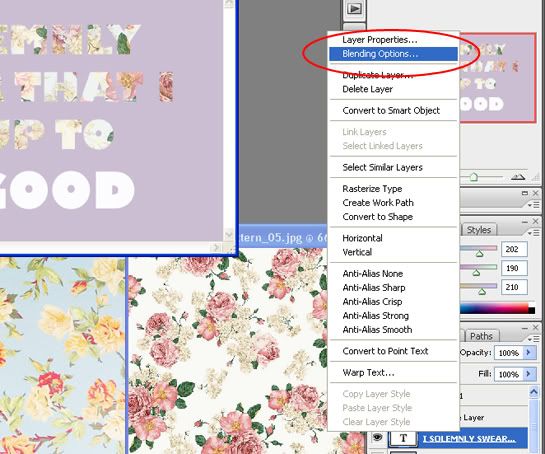
Step 15
The
last touch up! Click on the “Text Layer” (look at the red circle) at the Layers
Box. Then click ur right mouse and choose “Blending Options”
Step 16
Click
on “Stroke” then freely change the color and size. After that, click OK.
Step 17
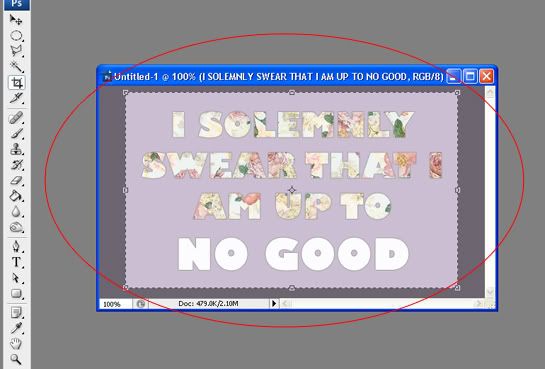
AND THIS IS HOW IT LOOKS NOW!
Step 18
Lastly, I’m going to use the “Crop Tool” (or by
simply typing “C”) to crop it a bit
Step 19
FINALLY! TADAAAA. WE’RE DONE! :D
GOODLUCK! :)












23 feedbacks:
nice tutorial ;) followed.
So cool. I want to do this.
http://www.thegirlieblog.com
Thanks for the tips kak! :D
http://finalexpectation.blogspot.com/
awww nice tutorial, btw can you give e tutorial make gif photo sabila?
im following you now, hope you can following back
will try to apply this cool tutorial.. :D
ih aku juga praktek loh yg watercolor!!! hahahahaha!!1
tq bilaa :)
i tried this tutorial right away and guess what? IT WORKS! omg, finally i can collaborate with photoshop, i've been so clueless on photoshop. thank you for posting this tutorial! you just made my life a bit better :)
heheh..
kak, kenapa foto nya gak muncul ya? photobucket nya ada masalah sepertinya. thanks
My brother recommended I might like this blog. He was totally right. This post actually made my day. You can not imagine simply how much time I had spent for this information! Thanks!
SKY Lightweight Half Moon Shaped Violin Case 4/4 Size (Black)
fotonya ga muncul kakaaa. bisa tolong dibantu?
thank you sabila :)
That is very good tutorial. i dont know about this but now it clear for me.
Clipping Creations India
Offshore Clipping Path
Arafin Media
Its very good learn for beginners and also for me, because am begin level Knowledge, Thanks for sharing good post. Web Design Company Bangalore | Website Designing Bangalore
Excellect presentation and really good updated stuff, with fully functional limited version too. Web Design Bangalore
Great tutorial. Thanks for sharing this post.
clipping path service
Nice blog, thanks for sharing with us this informative blog. Visit our page for freight forwarders and logistic india.
Freight Forwarders in India
Very Useful List!! Helpful Tutorials, Lessons for web designer and computer programmers!! scopeguide
soutdoor
Details here
Rahman
I haven't seen this type of article and containing unique content which is really very helpful. I am giving this service photo restoration greenville sc in cheap price.
Thanks for sharing this articles this is really helpful for me. We are providing services your business which is Cinchonize avail it now.
Useful photoshop tutorial and informative article you have written here. Liked and admired this blog. Image Retouching
Photo Editing Helps
Neck Joint
Photoshop Guideline
Clipping Path Tutorial
Drop Shadow Helps
Background Remove
Image Editing
Image Cut Out
Photo Manipulation
This is a very informative post. Thanks for sharing.
india gifts mall
Thanks for the shared this post with us. I really enjoyed your post.
Considering this post is ten years old it is still very much useful and can teach people much. Sure photoshop has changed drastically but the basics never change and this post can help learn the basic now.
Post a Comment